Disaster Recovery (Geo) promotion runbooks
Geo planned failover for a multi-node configuration
| Component | Configuration |
|---|---|
| PostgreSQL | Omnibus-managed |
| Geo site | Multi-node |
| Secondaries | One |
This runbook guides you through a planned failover of a multi-node Geo site with one secondary. The following 2000 user reference architecture is assumed:
The load balancer node and optional NFS server are omitted for clarity.
This guide results in the following:
- An offline primary.
- A promoted secondary that is now the new primary.
What is not covered:
- Re-adding the old primary as a secondary.
- Adding a new secondary.
Preparation
root access to the
secondary to promote it, because there isn’t provided an automated way to
promote a Geo replica and perform a failover.On the secondary site:
- On the top bar, select Main menu > Admin.
-
On the left sidebar, select Geo > Sites to see its status. Replicated objects (shown in green) should be close to 100%, and there should be no failures (shown in red). If a large proportion of objects aren’t replicated (shown in gray), consider giving the site more time to complete.
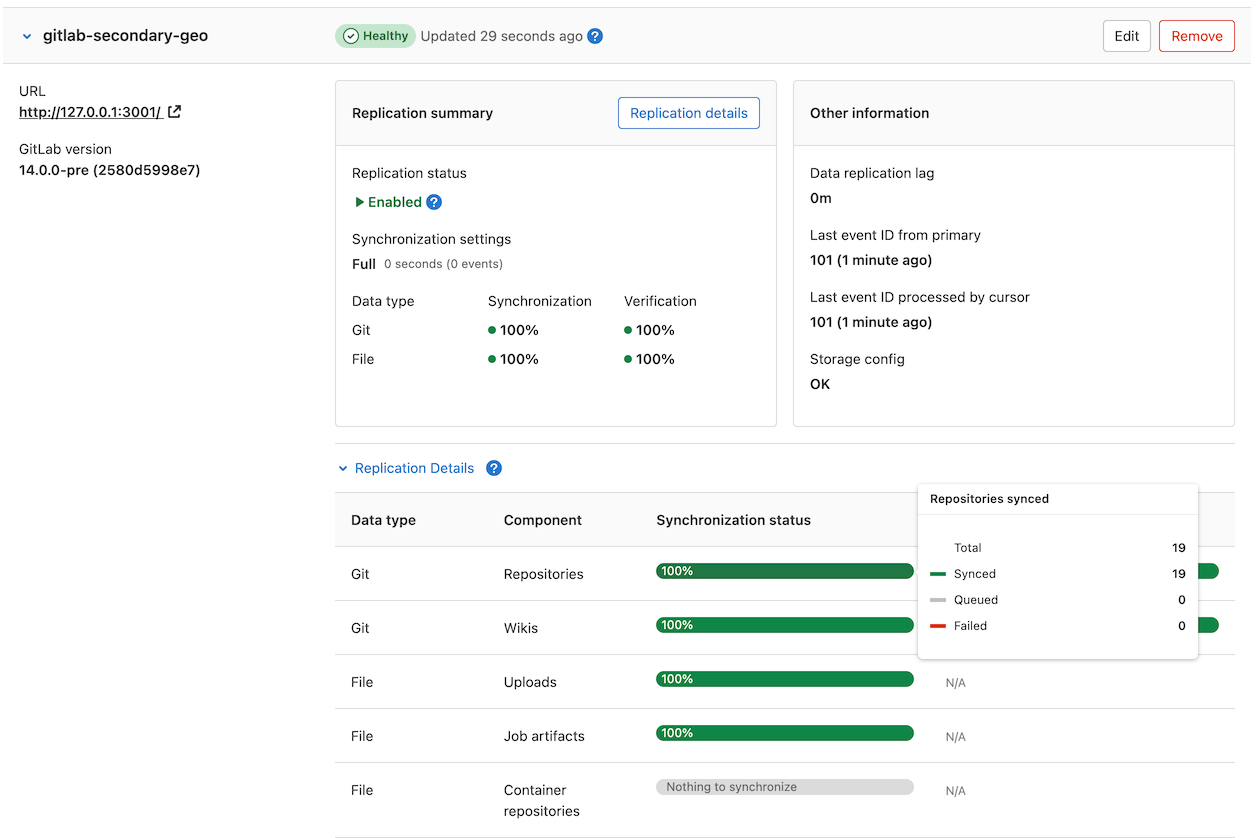
If any objects are failing to replicate, this should be investigated before scheduling the maintenance window. After a planned failover, anything that failed to replicate is lost.
You can use the Geo status API to review failed objects and the reasons for failure. A common cause of replication failures is data that is missing on the primary site - you can resolve these failures by restoring the data from backup, or removing references to the missing data.
The maintenance window doesn’t end until Geo replication and verification is completely finished. To keep the window as short as possible, you should ensure these processes are close to 100% as possible during active use.
If the secondary site is still replicating data from the primary site, follow these steps to avoid unnecessary data loss:
-
Until a read-only mode is implemented, updates must be prevented from happening manually to the primary. Your secondary site still needs read-only access to the primary site during the maintenance window:
-
At the scheduled time, using your cloud provider or your site’s firewall, block all HTTP, HTTPS and SSH traffic to/from the primary site, except for your IP and the secondary site’s IP.
For instance, you can run the following commands on the primary site:
sudo iptables -A INPUT -p tcp -s <secondary_site_ip> --destination-port 22 -j ACCEPT
sudo iptables -A INPUT -p tcp -s <your_ip> --destination-port 22 -j ACCEPT
sudo iptables -A INPUT --destination-port 22 -j REJECT

sudo iptables -A INPUT -p tcp -s <secondary_site_ip> --destination-port 80 -j ACCEPT
sudo iptables -A INPUT -p tcp -s <your_ip> --destination-port 80 -j ACCEPT
sudo iptables -A INPUT --tcp-dport 80 -j REJECT

sudo iptables -A INPUT -p tcp -s <secondary_site_ip> --destination-port 443 -j ACCEPT
sudo iptables -A INPUT -p tcp -s <your_ip> --destination-port 443 -j ACCEPT
sudo iptables -A INPUT --tcp-dport 443 -j REJECT
From this point, users are unable to view their data or make changes on the primary site. They are also unable to sign in to the secondary site. However, existing sessions must work for the remainder of the maintenance period, and so public data is accessible throughout.
-
Verify the primary site is blocked to HTTP traffic by visiting it in browser via another IP. The server should refuse connection.
-
Verify the primary site is blocked to Git over SSH traffic by attempting to pull an existing Git repository with an SSH remote URL. The server should refuse connection.
-
On the primary site:
- On the top bar, select Main menu > Admin.
- On the left sidebar, select Monitoring > Background Jobs.
- On the Sidekiq dashboard, select Cron.
- Select
Disable Allto disable any non-Geo periodic background jobs. - Select
Enablefor thegeo_sidekiq_cron_config_workercron job. This job re-enables several other cron jobs that are essential for planned failover to complete successfully.
-
-
Finish replicating and verifying all data:
Not all data is automatically replicated. Read more about what is excluded.- If you are manually replicating any data not managed by Geo, trigger the final replication process now.
- On the primary site:
- On the top bar, select Main menu > Admin.
- On the left sidebar, select Monitoring > Background Jobs.
- On the Sidekiq dashboard, select Queues, and wait for all queues except
those with
geoin the name to drop to 0. These queues contain work that has been submitted by your users; failing over before it is completed, causes the work to be lost. -
On the left sidebar, select Geo > Sites and wait for the following conditions to be true of the secondary site you are failing over to:
- All replication meters reach 100% replicated, 0% failures.
- All verification meters reach 100% verified, 0% failures.
- Database replication lag is 0 ms.
- The Geo log cursor is up to date (0 events behind).
- On the secondary site:
- On the top bar, select Main menu > Admin.
- On the left sidebar, select Monitoring > Background Jobs.
- On the Sidekiq dashboard, select Queues, and wait for all the
geoqueues to drop to 0 queued and 0 running jobs. - Run an integrity check to verify the integrity of CI artifacts, LFS objects, and uploads in file storage.
At this point, your secondary site contains an up-to-date copy of everything the primary site has, meaning nothing is lost when you fail over.
-
In this final step, you must permanently disable the primary site.
When the primary site goes offline, there may be data saved on the primary site that has not been replicated to the secondary site. This data should be treated as lost if you proceed.If you plan to update the primary domain DNS record, you may wish to lower the TTL now to speed up propagation.When performing a failover, we want to avoid a split-brain situation where writes can occur in two different GitLab instances. So to prepare for the failover, you must disable the primary site:
-
If you have SSH access to the primary site, stop and disable GitLab:
sudo gitlab-ctl stopPrevent GitLab from starting up again if the server unexpectedly reboots:
sudo systemctl disable gitlab-runsvdir(CentOS only) In CentOS 6 or older, it is challenging to prevent GitLab from being started if the machine reboots isn’t available (see Omnibus GitLab issue #3058). It may be safest to uninstall the GitLab package completely withsudo yum remove gitlab-ee.(Ubuntu 14.04 LTS) If you are using an older version of Ubuntu or any other distribution based on the Upstart init system, you can prevent GitLab from starting if the machine reboots asrootwithinitctl stop gitlab-runsvvdir && echo 'manual' > /etc/init/gitlab-runsvdir.override && initctl reload-configuration. -
If you do not have SSH access to the primary site, take the machine offline and prevent it from rebooting. As there are many ways you may prefer to accomplish this, we avoid a single recommendation. You may have to:
- Reconfigure the load balancers.
- Change DNS records (for example, point the primary DNS record to the secondary site to stop using the primary site).
- Stop the virtual servers.
- Block traffic through a firewall.
- Revoke object storage permissions from the primary site.
- Physically disconnect a machine.
-
Promoting the secondary site running GitLab 14.5 and later
-
SSH to every Sidekiq, PostgreSQL, and Gitaly node in the secondary site and run one of the following commands:
-
To promote the secondary site to primary:
sudo gitlab-ctl geo promote -
To promote the secondary site to primary without any further confirmation:
sudo gitlab-ctl geo promote --force
-
-
SSH into each Rails node on your secondary site and run one of the following commands:
-
To promote the secondary site to primary:
sudo gitlab-ctl geo promote -
To promote the secondary site to primary without any further confirmation:
sudo gitlab-ctl geo promote --force
-
- Verify you can connect to the newly promoted primary site using the URL used previously for the secondary site.
- If successful, the secondary site is now promoted to the primary site.
Promoting the secondary site running GitLab 14.4 and earlier
gitlab-ctl promote-to-primary-node and gitlab-ctl promoted-db commands are
deprecated in GitLab 14.5 and later, and removed in GitLab 15.0.
Use gitlab-ctl geo promote instead.ActiveRecord::RecordInvalid: Validation failed: Name has already been taken error during this process, read
the troubleshooting advice.The gitlab-ctl promote-to-primary-node command cannot be used in
conjunction with multiple servers, as it can only
perform changes on a secondary with only a single machine. Instead, you must
do this manually.
-
SSH in to the PostgreSQL node in the secondary and promote PostgreSQL separately:
sudo gitlab-ctl promote-dbIn GitLab 12.8 and earlier, see Message:
sudo: gitlab-pg-ctl: command not found. -
Edit
/etc/gitlab/gitlab.rbon every machine in the secondary to reflect its new status as primary by removing any lines that enabled thegeo_secondary_role:## In pre-11.5 documentation, the role was enabled as follows. Remove this line. geo_secondary_role['enable'] = true ## In 11.5+ documentation, the role was enabled as follows. Remove this line. roles ['geo_secondary_role']After making these changes Reconfigure GitLab each machine so the changes take effect.
-
Promote the secondary to primary. SSH into a single Rails node server and execute:
sudo gitlab-rake geo:set_secondary_as_primary -
Verify you can connect to the newly promoted primary using the URL used previously for the secondary.
-
Success! The secondary has now been promoted to primary.
Next steps
To regain geographic redundancy as quickly as possible, you should add a new secondary site. To do that, you can re-add the old primary as a new secondary and bring it back online.